One of the strongest methods to grow your readership is through newsletter campaigns. While sometimes metrics like opens and click-through rates can be low, emails are still a great way to target niche audiences to convert them into loyal followers. At RebelMouse, we have a detailed and intuitive integration with Mailchimp's platform. Here's how it works.
Linking and Customizing Sign-up Units for Mailchimp Lists
We have a unique integration with Mailchimp in our Layout & Design tool that makes it easy to plug in a newsletter widget anywhere and then customize it. You can choose which list or group the widget correlates to so that when you start collecting email addresses from sign-ups, they'll end up in the right place in your Mailchimp account.
For Mailchimp Groups or Embedding Custom Mailchimp Sign-up Widgets
You can easily copy Mailchimp newsletter codes for groups and drop them into RebelMouse as custom HTML. The style sheets and CSS needed can be entered as well.
Controlling and Customizing Templates
It's also easy to code your own RebelMouse-friendly template in Mailchimp that uses your site's tags. If you're looking to match the template to an exact RebelMouse post, the template should look something like this:
However, just using RebelMouse tags won't make the final product look completely optimized for Mailchimp. But you can further modify the template using ad tags and Mailchimp's styling tools. You can also populate content with those correct tags by using a daily or weekly newsletter, for example. This is how our example looks:
If you want to customize your daily or weekly newsletter so it looks similar to the template above, follow these steps:
Send the post you want to turn into a template as a campaign draft to Mailchimp. Then, find the post you want to edit in Mailchimp's code editor. It should be sandwiched in between <tr> tags.
Next, edit the image, headline, and description as needed. You can also link out to a post or other content in the same view. Here's how to do it:
Here's a screenshot of the example code in Mailchimp's editor:
Add a "Keep Reading" Feature
You can add a "Keep Reading" button to any Mailchimp template. Here's what it looks like:
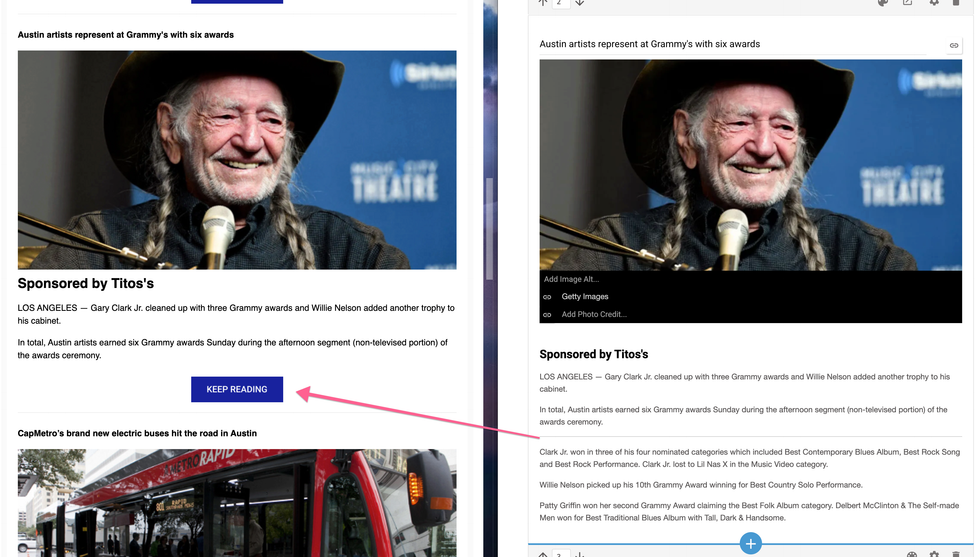
To use this feature, add the following code to your template:
{{#has_brief}}{{{brief}}} <a href="{{post_url}}">Keep Reading</a>{{/has_brief}}{{^has_brief}}{{body}}{{/has_brief}}
Here's a description of the parameters:
|
has_brief |
True if the post has a brief parameter filled (used to determine the "Keep Reading"). |
|
brief |
Brief parameter (used to show the first part of "Keep Reading"). |
Sending a Campaign as a Post
Any article on RebelMouse can easily become a newsletter campaign. You can launch a newsletter right from Entry Editor, and then choose the Mailchimp list, group, or template you want to use.
Here's how it works:
Turn Native, Sponsored Stories Into an Automated Weekly Newsletter
RebelMouse has a dashboard that you can use to configure key newsletter preferences, including any daily or weekly newsletters you may have scheduled through Mailchimp.
Here is a step-by-step tutorial of how to set it up:
Set your newsletter settings in the newsletter dashboard , and make sure to uncheck the field labeled "Send this campaign automatically" for a daily/weekly newsletter so it will be sent as a draft. Make sure you take into account that the send time you choose will be reflected in Mailchimp as well.
In Mailchimp, click on the Campaigns tab, and then click on Draft:
Open your campaign draft in edit mode, and then fill in all the necessary fields, such as sender, subject line, etc.
To add a new sponsored post, you need to find the HTML version of the post (or posts) you're using in the newsletter. This code should be in between <tr></tr> tags. Once located, copy the HTML and paste it where you want to add it in the newsletter:
Now you can begin editing the headline, links, and images of the post's HTML:
Here is how to edit the post link out:
Here's how you can change the image:
And this is how the image looks after you save it:
Here's how to edit the post's headline:
If you want to delete a post, simply delete the HTML version. When your template is ready, you can schedule it for a later date and time or send it right away via Mailchimp.
The same header and footer for your Mailchimp campaigns will automatically carry over as well, which typically includes your social links. If you have any questions about this integration, please contact your account manager.


